How to Create a Colorful Background in Photoshop
Posted by Unknown in Photoshop Tutorials on Saturday, March 30, 2013
To make this colorful background you have to do some steps in Photoshop. I am using Photoshop CS4 . You can use any version of Photoshop.
Step-1
Go to the File > New take a 1280x720 ratio and press OkStep-2
Now set the background color Black and foreground color white
Now select the Gradient tool box and press shift button and drag the mouse in the middle bottom to up.
Now select the Gradient tool box and press shift button and drag the mouse in the middle bottom to up.
You will see look like this:

Step-3
Click Filter > Distort > Wave then You will see the box like this and set Number of Generators=10 and select Square from type press Ok

Step-4
Now Double click on the Background layer to unlock it and press ok.
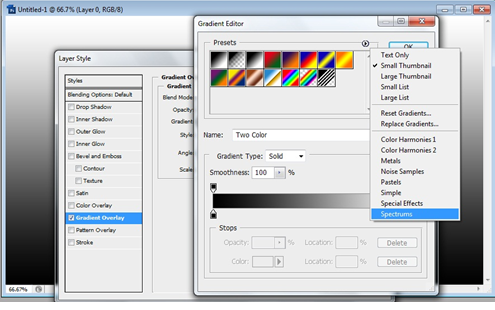
Now again double click on the layer and you will see the Layer Style window from there you have to click Gradient overly and after that you have to click on Gradient from the right side. Now click the right arrow button from the top and select Spectrum and press ok
Now again double click on the layer and you will see the Layer Style window from there you have to click Gradient overly and after that you have to click on Gradient from the right side. Now click the right arrow button from the top and select Spectrum and press ok

Now select the Spectrum Gradient and press ok. Then you have to set Angle =0 and select Blend mode to Linear Burn and set opacity 80%
Step-5
Now you have to take another layer to press Ctrl+N and again take the gradient tool bar and drag the mouse from middle bottom to up as like before. After that you have to set the blending mode as Soft Light. Then you will see the little bit darker.
Step-6
Now you have to make a brush. For that you have to go File > New and set wide is 50 and Height is 100 then press ok. Now make this black color. Now go to Edit > Define Brush Preset and press ok.
Now select the new Brush which you make right now from the brush tool. Then go to Window > Brush then you will see a window from the right….
Now select the new Brush which you make right now from the brush tool. Then go to Window > Brush then you will see a window from the right….

• Now click on Brush Tip Shape and set the Diameter 100px and Spacing 300%
• Now click Shape dynamics and Set size Jitter 200%
• Now click Scattering and set Scatter as 1000% and Count Jitter to 100%
• Now click on Other Dynamics and set Opacity 200%
Step-7
• Now go to the background Image and take the brush which you make and resize your brush as you like and take a new layer press Ctrl+N.
• Now select the background color as White and click on the background using your brush and make a wonderful look of your Computer wallpaper.
• Now you can change the Blending Mood as Overlay...
This entry was posted on Saturday, March 30, 2013 at 11:27 AM and is filed under Photoshop Tutorials. You can follow any responses to this entry through the RSS 2.0. You can leave a response.
- No comments yet.


